Pyramid Peak and Mount Price (Crystal Range Traverse) in Eldorado National Forest, CA

Hike Pyramid Peak and Mount Price (Crystal Range Traverse) Eldorado National Forest, CA

Class 4 16.2 miles 5500 gain 9-12 hrs Loop Jul 31, 2025
Effort
Beauty
Personality
Solitude

Pyramid Peak and Mount Price (Crystal Range Traverse) GPX Track

I need to offset my substantial website costs somehow! You can download a hike/drive GPX to assist you here. Before sharing my GPX tracks with others, please remember my site is otherwise a free resource.

The traverse from Pyramid Peak to Mount Price is known as the Crystal Range Traverse. I’d been saving these peaks for a longer outing that would span the entire Crystal Range to its northern end, but coordinating that route proved too complicated. Plus, Aaron and I wanted a hike together, and this traverse made a perfect meeting point. There are several ways to complete the traverse: from the west on a mostly forested route, from the east on a long approach from Echo Lakes, or from the south via the Pyramid Peak Trail, which we chose. The Echo Lakes approach might have been the most straightforward, but we’d used it for Ralston Peak a few months earlier, and today’s route offered the added bonus of visiting Horsetail Falls on the way out.

Aaron and I met at a pull-out across from the unmarked Pyramid Peak Trailhead. The Caldor Fire of 2021 burned much of this area, yet the trail was in excellent shape and clearly well traveled. Despite the charred landscape, it was a prettier hike than we expected. After a steady climb through steep forest with occasional views, we emerged above treeline at the base of Pyramid Peak.

A bouldery Class 2 slope led us to the summit, where Lake Aloha shimmered below and we could trace the traverse toward Mount Price. Last year I’d completed a big loop through the Desolation Wilderness, and from here I enjoyed a clear view of many of those peaks.

Descending along the ridgeline of more Class 2 boulders to start the traverse, we soon reached the reported Class 4 crux. This move is required to access the narrow crest via the easiest weakness. We found a Class 2/3 ramp and a few blocky scramble moves, pretty tame for Class 4. Beyond that, the ridge continued without further technical challenges.

We went up and over Peak 9686, strewn with giant boulders, and onward toward Mount Agassiz. The traverse offered steady Class 2 boulder-hopping and occasional Class 3 moves when we chose to avoid tedious detours.

The ascent to Mount Agassiz climbs a potentially brushy slope, so we stayed near the rim to bypass most of it, taking a loose Class 2 option instead. A short Class 3 crevice through an outcropping brought us to Agassiz’s summit, and from there it was a straightforward hike to Mount Price.

To reach Mosquito Pass, we needed to descend from Mount Price. Its east face is quite sheer, so we followed cairns that skirted the summit cliff to the left, then stayed on the ridge until it dropped via Class 2 terrain to the slope below. Lake Aloha stretching out below us as we followed a broad granite hump. There were lots of mini obstacles along the way, but anything significant can be easily avoided.

From Mosquito Pass we joined the Rubicon Trail, wrapping around Lake Aloha’s north side until we met the PCT and turned south. We then took the Lake of the Woods Trail to its end at Ropi Lake, where the path faded and eventually disappeared. Cairns grew sparse as we continued down the Pyramid Creek drainage past a few small lakes.

We reached the extensive cascades of Horsetail Falls, a gorgeous finale to the day. The standard route to get around the falls drops away from the watercourse to easier terrain, but we chose to stay close to the falls instead. This proved an excellently beautiful choice, though a few slick Class 3 ledges required care. Braided social trails reappeared and soon merged with the Pyramid Creek Trail, leading us to its trailhead. This is a very popular section trail, and the trailhead requires a fee. Our cars were parked just under a mile along the busy highway, and with almost no shoulder we joked that the final road walk felt like the most treacherous part of the day.

PEAKS ON HIKE
Elevation (ft) / Prominence (ft)
Peaks on hike
Elevation
Prominence
1
Pyramid Peak
9988 ft
2615 rise
2
Peak 9686
9686 ft
154 rise
3
Mount Agassiz
9970 ft
261 rise
4
Mount Price
9975 ft
515 rise

Hire me or show me some love!

Hire/refer me as a web developer or send me a few bucks if you find my site useful. I'm not sponsored, so all fees are out-of-pocket and my time preparing trip reports is unpaid. I really appreciate it!

Looking back toward the pull-out on the opposite side of the road once we'd located the start of the Pyramid Peak Trail.
Up through a burn area, but the trail was in good shape and sees regular use.
After a bunch of feet of fairly steep forest hiking, an opening with a view back.
Despite being a burn area, it was still a pretty hike.
Ascending past the burn area and making progress up the Pyramid Peak Trail.
Pyramid Peak pokes up ahead.
View back as we near the base of Pyramid Peak.
Approaching Pyramid Peak's Class 2 slope.
Near the summit, view back at the scramble.
Pyramid Peak summit, view north. Lake Aloha seen right, the traverse to Mount Price extends to the left.
Close-up of Lake Aloha and Mount Tallac (center).
Heading down the Class 2 ridgeline from Pyramid Peak to begin the traverse to Mount Price.
View back up at the bouldery slope.
Ridgeline ahead, the Class 4 move somewhere in the center. It's maybe possible you could stay low and reascend farther along the ridgeline for a less technical option, but we wanted to stick to the crest.
View back toward Pyramid Peak as we reach the Class 4 move.
Aaron starting up the Class 4. It began with a ramp, followed by some ledgy moves on large blocks. As far as Class 4 goes, it's pretty tame.
View back down at the Class 4.
View back along the ridgeline toward the short, narrow section housing the Class 4. Pyramid Peak seen top.
Another close-up toward Lake Aloha. Jacks and Dicks Peaks seen left, Mount Tallac right of center.
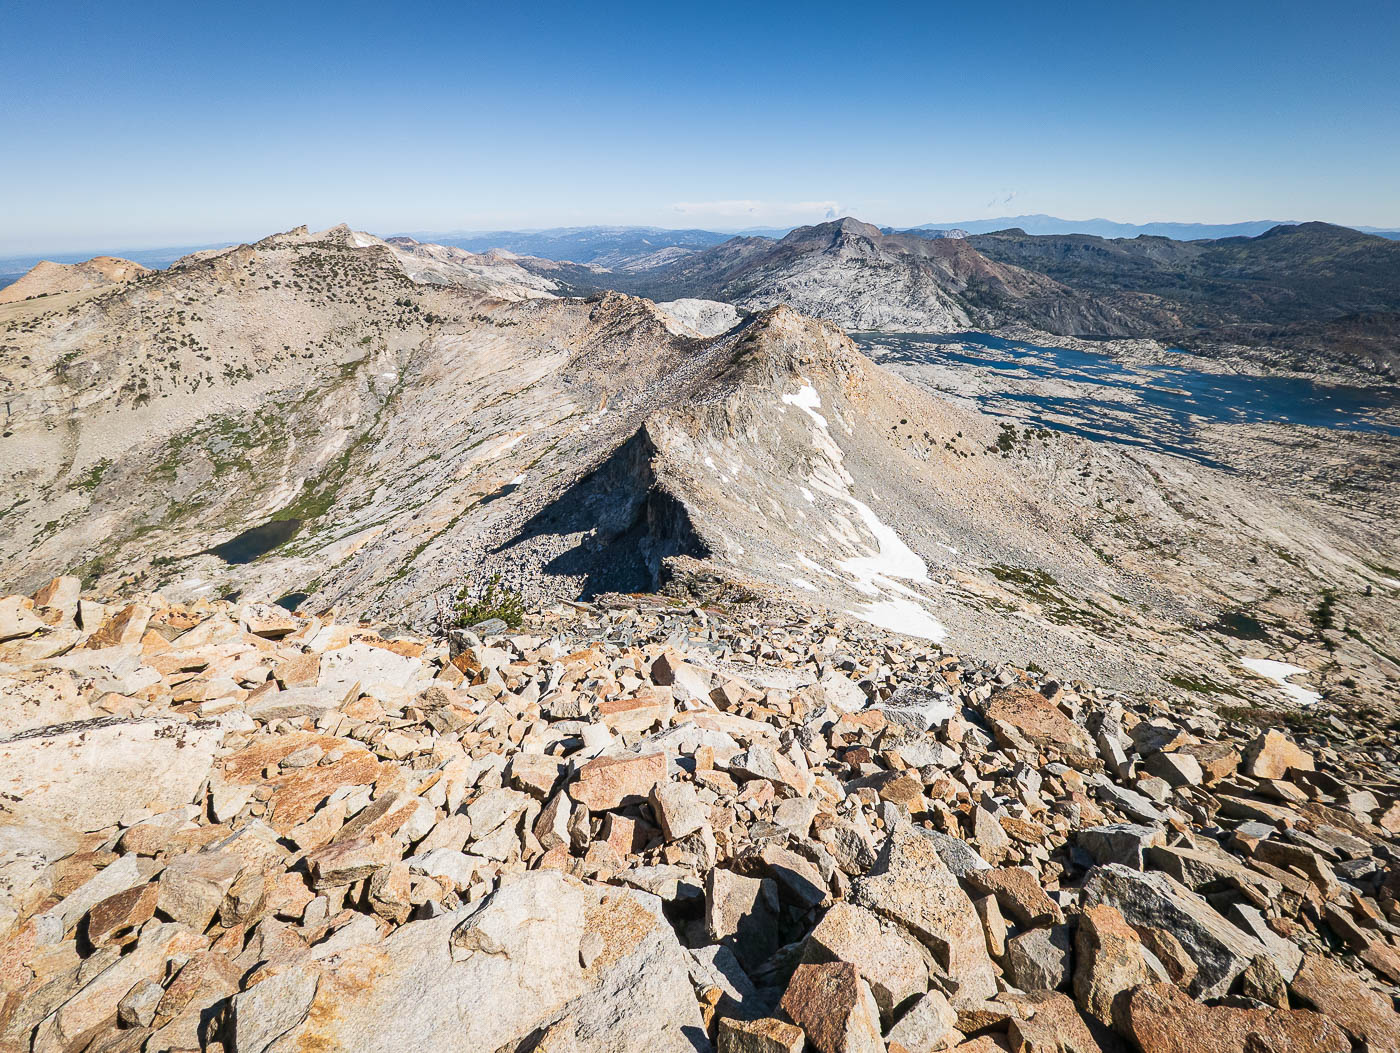
We passed over Peak 9686, which was strewn with large boulders. Mount Agassiz seen next along the ridgeline.
Looking back at the traverse so far, Peak 9686 above Aaron and Pyramid Peak top center. Plenty of Class 2 boulder hopping, and we often pulled Class 3 moves just to avoid more tedious work-arounds.
There was a really cool drop on the right side of the ridge.
Another shot back at the traverse.
A steep, loose slope. We kept closer to the ridge crest (right), but it's likely another option exists to the left.
View back down, Lake Aloha left, Pyramid Peak right.
Approaching a Class 3 move through a crevice in the outcropping above to access the Mount Agassiz summit.
Class 3 move to overcome an obstacle.
Mount Agassiz summit, view toward Mount Price.
Looking back at the traverse from Pyramid Peak to Mount Agassiz.
Nearing Mount Price, looking back toward Mount Agassiz.
Mount Price summit, view north toward the lower peaks of the Crystal Range.
Class 3 to continue north from Mount Price. It has a short cliff that needs to be wrapped around.
Bypassing the steep cliff by wrapping below Mount Price on its west side, about 50 feet below the summit.
Continuing along the ridge for a short time. The short cliff we wrapped beneath on the north side of Mount Price seen behind Aaron.
Class 2 to escape the ridgeline and reach the gorgeous granite hump seen below.
Looking back up as we make progress down from Mount Price, seen above.
Descending to Mosquito Pass where we'd pick up the Rubicon Trail.
There are plenty of little obstacles like this to overcome slickrock ledges and drops.
Mosquito Pass on the left.
Looking back up toward Mount Price.
Stunning Lake Aloha.
We picked up the Rubicon Trail from Mosquito Pass.
The Rubicon Trail wraps around the north side of Lake Aloha.
Looking back up toward Mount Price (left).
Junction with the PCT, which we took heading south.
Lake Aloha!
Lake Aloha!
View up toward the Crystal Traverse, Pyramid Peak on the left.
We left the PCT and dropped down to Lake of the Woods via Lake of the Woods Trail.
Lake of the Woods.
Lake of the Woods.
The trail became slowly less obvious as it descended toward Ropi Lake, seen ahead.
Creek crossing below Ropi Lake.
Aaron trying to find a spot to cross. Pyramid Peak seen top left. The trail is only marked by an occasional cairn from here until we reach Pyramid Creek far below.
View back as we navigate the Pyramid Creek drainage.
One of a few small lakes above Horsetail Falls.
Upper portion of Horsetail Falls.
The "trail" wraps farther away from Horsetail Falls, but we wanted to keep close to it. The result was some Class 3, and if wet the slickrock would be dangerous.
Above Horsetail Falls, view down into the Pyramid Creek drainage.
Navigating Class 2/3ledges next to Horsetail Falls.
We were very impressed at how gorgeous Horsetail Falls was.
View back as we reached the Pyramid Trail, which led us back to a very popular trailhead.
Horsetail Falls, seen as we approach the Pyramid Creek Trailhead.
From the Pyramid Creek Trailhead, it was a bit under a mile to get back to the Pyramid Peak Trailhead. There were a lot of cars and very little shoulder.

Hire me or show me some love!

Hire/refer me as a web developer or send me a few bucks if you find my site useful. I’m not sponsored, so all fees are out-of-pocket and my time preparing trip reports is unpaid. I really appreciate it!