Matterhorn Peak and Whorl Mountain in Humboldt-Toiyabe National Forest, CA

Hike Matterhorn Peak and Whorl Mountain Humboldt-Toiyabe National Forest, CA

Class 3 17.5 miles 7300 gain 9-12 hrs Out + Back Aug 1, 2025
Effort
Beauty
Personality
Solitude

Matterhorn Peak and Whorl Mountain GPX Track

I need to offset my substantial website costs somehow! You can download a hike/drive GPX to assist you here. Before sharing my GPX tracks with others, please remember my site is otherwise a free resource.

Matterhorn Peak is a jagged-looking summit, the tallest along the Sawtooth Ridge that sits on the border between Humboldt-Toiyabe National Forest and Yosemite National Park. Sawtooth Ridge marks the northern edge of the Sierra’s more jagged skyline before transitioning pretty abruptly to the softer peaks found farther north.

There are a few ways to reach the summit, but I approached via the standard Class 2 route, a fairly straightforward outing with fantastic views. Just to its south sits Whorl Mountain, a more interesting peak with an unlikely talus cave route that requires a bit more effort than its much more popular and taller neighbor.

I was told by an attendant it’s fine to park at the marina for day use only within the boundaries of Annett’s Mono Village (overnight requires a fee and permit), so I hiked from there through the campground along the western reaches of Upper Twin Lake and headed up the Horse Creek Trail. After a few lengthy switchbacks, I passed Horsetail Falls and continued south into the Horse Creek drainage. Sawtooth Ridge was brightly lit with morning light as its jagged peaks came into view.

A major reason I’d chosen to hike Matterhorn Peak today was to check out the brainchild of Bob Burd, the infamous annual Sierra Challenge peakbagging event. I love being overstimulated and social, but perhaps not in the mountains on such a busy Challenge day, so I found myself preferring to travel solo. After my usual late start, I was finally able to catch up to the larger group, and past there I made it a mission to rush hard in order to try to catch up and trade hugs with various friends along the way.

The Horse Creek Trail was in great shape, including during extended section of ascent through a talus field on the east side of Horse Creek at around 9000′. Above the steep talus field the terrain leveled out for a while, but the trail became trickier to follow. I found it easiest to stick close to the creek to avoid any short bouts of bushwhacking. Once above the upper reaches of Horse Creek and deep into the boulder field, I picked my way across lumpy, talus-covered ground, following faint social trails whenever they offered a short stretch of tundra. The route climbed steadily toward Horse Creek Pass at the base of Matterhorn Peak.

Before reaching the pass, I veered off to the right and started boulder-hopping up a steeper Class 2/2+ slope to gain elevation more quickly. Soon Matterhorn Peak emerged in full view. The slope ahead was a sandy slog, but an eroded track ran basically straight up the center toward the summit. Stray too far and you’d find steeper grades or brush, but it’s not too bad in any case.

After the slog up to the base of Matterhorn Peak, I swung left, following cairns to the south ridge, tackling steep Class 2/2+ blocks as I wrapped beneath the ridgeline and gaining it just south of the summit. An easy hike got me to the top, where I could see the major peaks peaks rising around me, as well as south toward the bench that would lead to Whorl Mountain.

After dropping back down, I filled up my water at one of many little springs above the Spiller Creek drainage. Here, I started chatting with the delightful and psyched Parker, who hesitated only briefly before agreeing to head with me to Whorl Mountain. Dropping only slightly, we traversed the grassy, wide bench beneath the sheer ridgeline. After a mile or so, the bench narrowed and faded into a slope as Whorl Mountain’s east face became a more reasonable grade and we could begin ascending.

We began threading through a mix of granite slabs and loose rock. It stayed steep, the slope funnelling us into a broad gully where we scrambled Class 2/3 terrain, generally leading north. Eventually the terrain grew even steeper, so we shifted our trajectory northeast. This mean hopping over a wide rib, dropping into a wide gully, ascending over another wide rib, and then dropping into yet another wide gully. We ascended this one for a couple hundred feet until a cluster of giant boulders on the face. Here, we wove through the boulders and located a deep crack that brought us to the base of the talus cave we’d both heard of, but hadn’t bothered to research what it looked like.

We took a moment to be sure this was the proper talus cave before starting through it, noting that it seemed harder than Class 3, but this was only an initial reaction since once we started pulling moves, we had a lot of fun and never felt it was more technical than that. Above the talus cave, the fun continued with more Class 2/3 scrambling. A striking ledge well below the ridge crest let us bypass the sketchy upper reaches. Beyond the ledge it was moderate scrambling to the top, and we took some time enjoying the summit before heading back.

PEAKS ON HIKE
Elevation (ft) / Prominence (ft)
Peaks on hike
Elevation
Prominence
1
Matterhorn Peak
12301 ft
1633 rise
2
Whorl Mountain
12034 ft
665 rise

Hire me or show me some love!

Hire/refer me as a web developer or send me a few bucks if you find my site useful. I'm not sponsored, so all fees are out-of-pocket and my time preparing trip reports is unpaid. I really appreciate it!

Starting out from Twin Lakes.
Along the switchbacks on the Horse Creek Trail.
Sawtooth Ridge in morning light above.
At the top of the switchbacks, now following the Horse Creek drainage.
Landscape opens up a bit at a junction with the Cattle Creek Trail.
Waving at the large, main Sierra Challenge group.
The trail leads through talus and up the steep slope ahead.
View back along the Horse Creek Trail as it ascends talus.
Above the talus, the terrain mellows out, but the trail is harder to follow.
Gurgling Horse Creek.
Lumpy talus-covered terrain, but there are a few social trail options that follow short spurts of tundra.
The route ascends to the center of this photo to Horse Creek Pass on the east side of Matterhorn Peak.
View back at my progress through the bowl.
I ascended prior to reaching Horse Creek Pass, instead choosing a Class 2/2+ boulder-hopping option to gain elevation more quickly.
Matterhorn Peak came into view. There are an infinite number of ways to ascend this somewhat annoying slope, but a particularly clear eroded trail exists up the center, heading nearly directly toward the summit. Deviating could mean a steeper slope or sections of brush, but overall it's a sandy slog to the outcropping seen center.
View south as I begin the ascent into the Spiller Creek drainage. I'll be heading that way later for Whorl Mountain. Horse Creek Pass seen left of center.
Over 1000 feet of this sort of terrain.
Matterhorn Peak seen center.
Close-up at the steep slog from Horse Creek Pass.
Wider shot as I near the base of Matterhorn Peak.
Once at the base of Matterhorn Peak, I veered left beneath it, following cairns leading to the south ridge.
Steep Class 2/2+ to the summit.
View back as I wrap beneath the ridgeline. There are definitely Class 3/4 routes to gain the summit more directly from here, if preferred.
On the south ridge of Matterhorn Peak.
Matterhorn Peak summit, view north toward Twin Lakes.
Matterhorn Peak, view south. The route to Whorl Mountain follows its base via a bench in the center of this photo.
Close-up toward Whorl Mountain, center.
Back down from Matterhorn Peak, now on the way to Whorl Mountain. We dropped very little elevation here - instead of taking the drainage, we followed a wide bench at the base of the ridgeline.
Along the bench.
Along the bench.
A cute tarn with a great backdrop along the bench.
The bench begins to get narrower and steeper, slowing disappearing into the steep eastern slope of Whorl Mountain.
We started up a variety of Class 2/3 obstacles, usually broad granite slabs.
It was always steep, but not always covered in granite slabs. We were having some trouble reading the slope, but just generally continued ascending north-ish.
View back down at our progress as the slope funneled us into a wide gully.
Just an idea of the angle of the ascent up the wide gully.
We left the wide gully, hopped over a wide rib, and dropped into an adjacent gully only to reach a crack weakness on the opposite side (center).
Coming up the Class 3 crack weakness.
We went over another rib and entered this gully for a while.
View back down the gully. We came from over the rib on the right.
We would around some boulders ahead, choosing to keep to crevices between them since staying high often resulted in drops.
Parker about to enter a key crack.
Ascending the crack.
Ahead is the talus cave that, while probably not the only route, serves as a less-technical way to get off the slope and reach the peak's south ridge.
View back from within the talus cave.
View back into the talus cave, which had a few Class 3 moves on solid boulders.
above the talus cave, we continued on fun Class 2/3 scrambling.
Whorl Mountain up there somewhere.
A very cool ledge on the west side of the ridge, which avoids the far-sketchier upper reaches.
View back along the ledge.
Class 2/3 to the summit from past the ledge.
Taking the ledge avoided that large pinnacle on the left.
Whorl Mountain summit, view south (the way we came).
Whorl Mountain, view north.
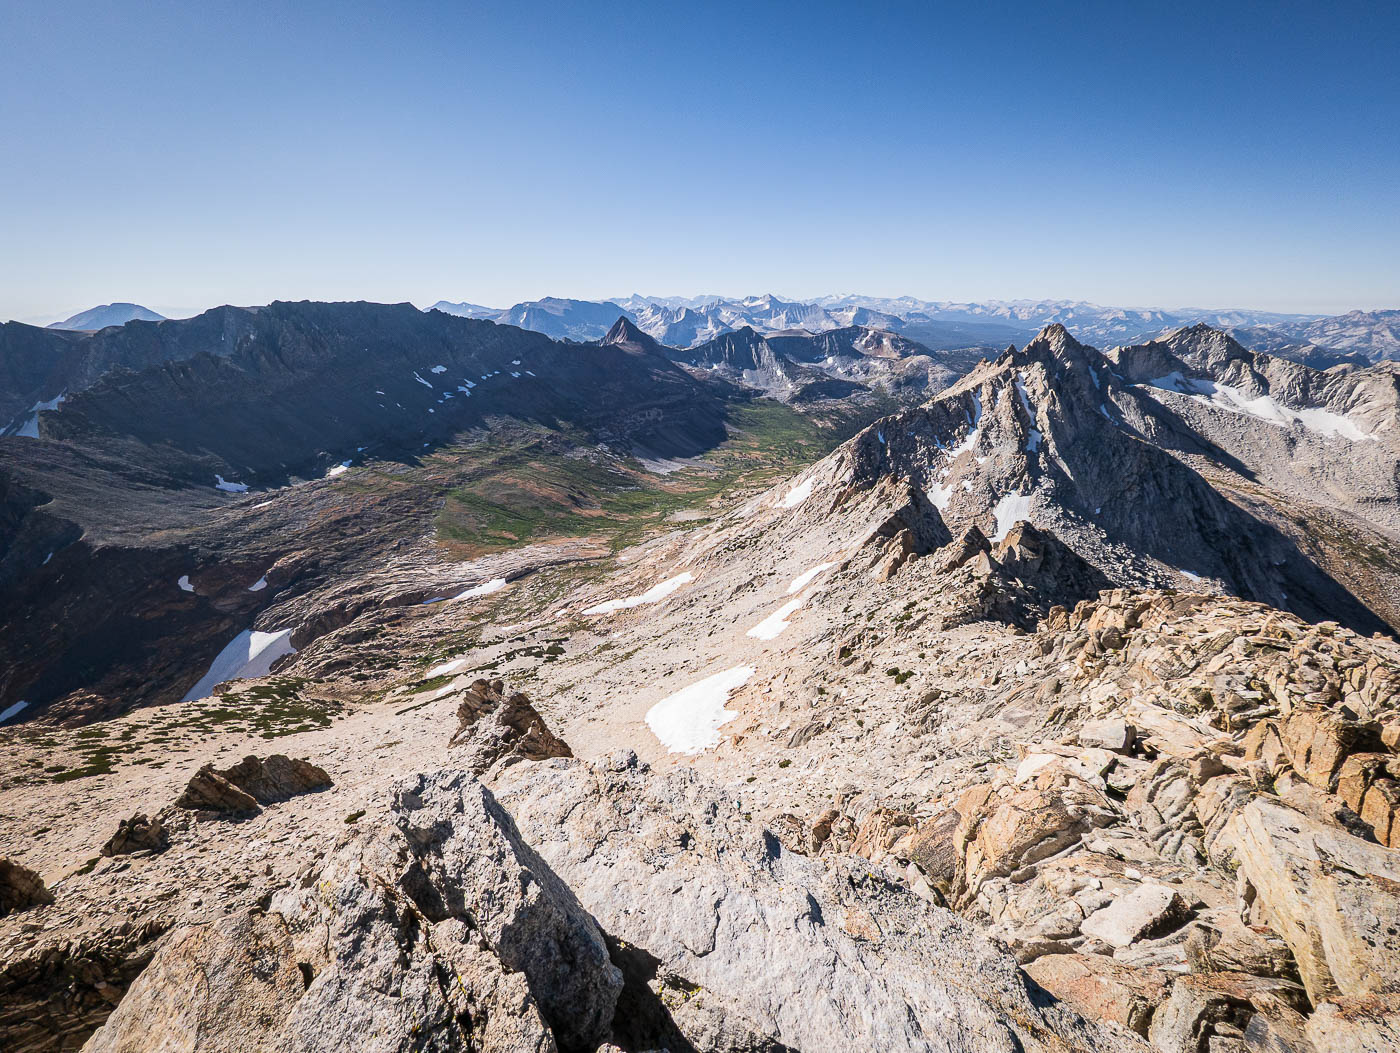
Matterhorn Peak (left) and Horse Creek Pass (right of center).
View east toward Virginia Peak, Excelsior Mountain, etc.

Hire me or show me some love!

Hire/refer me as a web developer or send me a few bucks if you find my site useful. I’m not sponsored, so all fees are out-of-pocket and my time preparing trip reports is unpaid. I really appreciate it!